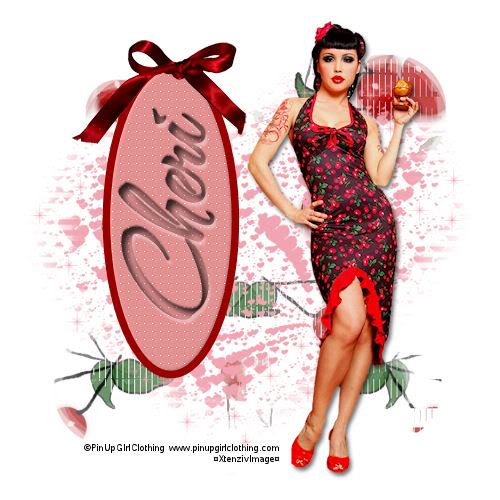
I am using an image from The link to Pin Up Girl Clothing
Image Tubed by ME,XtenzivImage HERE
Font: The Nautigal
(Just having the .TTF file open and minimized on your task bar will allow PsP to detect your font without you having to install it.)
XtenzCherryPaper1: By XtenzivImage,
HERE
Scrap Element bow by XtenzivImage,HERE
Mask is WSL_Mask 170 and WSL_Mask79 By Chelle
Masks are found in the navigation link.
Place these files in your masks folder.
This Tutorial was created using Corel's Paint Shop Pro® with the understanding
that you have a working knowledge of this program.
(I used PhotoX2 but you should have no trouble recreating it
with earlier versions of PSP)
Open a new image 500 X 500 transparent and flood fill white
Open XtenzCherryPaper1 copy and paste to new image as a new layer.
Apply WSL_Mask79, source luminance> show all mask> fit to layer.
right click the mask in layer pallet, merge group a pop up may ask if you want it merged to layer below click yes
Add new layer flood fill with #f1a4b1
apply WSL_Mask170, source luminance, show all mask, fit to layer.
right click mask in layer pallet, merge group to layer below Yes.
click on your preset shape Elipse in your materials pallet make your Forground #980000 background null or transparent>
width 8, draw out a long oval shape.
Convert to raster layer
With your magic wand tool click inside shape, Mode: replace> Matchmode: RGB> Tolerance: 42 >checked contiguous and Antialias >Feather:0
outside selected in drop down.
Selections modify > expand > by 2 pixels with it still selected add a new raster layer then change background color in materials pallet to #de8e8e and flood fill selection.
Effects> 3d effects > inner bevel> Bevel 2 > Width 5 > Smooth/depth = 1> Ambiance/Shine = 0 > color white >Angle 315
> Intensity 45 > Elevation 35.
Effects> texture effects> weave > Gap size 1> width 7> opacity 3> weave color black > gap color white > check fill gaps.
Open XtenzRedbowpsp2_4CherryChic and paste as new layer move to the top of the oval frame.
Add a new Raster layer. Click your text tool and add your name i used The Nautigal Font size 135 >stroke 1 >forground: black> background: #980000> as a: floating
I dedicate this tag to Cheri of Wildz Creationz her tuts have taught me lots.
I hope to tag a few of my favorite tut writers in my upcoming tuts so watch for yours!
Free rotate your name layer left by 90, move to center of your frame.
Selections>Load/Save Selection>Save Selection to Alpha Channel
while your font has the "marching ants" around it hit delete on your keyboard.
Selections>Load/Save Selection>Load Selection From Alpha Channel.
Apply the cutout filter Effects> 3d effects>Cutout settings> Vert/Horz = 5 Opac= 81 Blur= 10 shadow color black. ok
Add a drop shadow >Vert: -1> Horiz: 0> Opacity: 32> Blur: 2>Color: Black
Adjust> Brightness and contrast settings Brightness = -35 Contrast = 10.
Add a second drop shadow Settings Vert=4 Horiz=2 OPac= 35 Blur 3 color White.
Add main tube resize by 80% and move over to the right add a drop shadow I used V -4 H 2 Opac 50 Blurr 6.
Add all your copyrights, license and taggers mark if any.
Merge All Flatten and your done.
GREAT JOB!
THANK YOU
SO MUCH FOR TRYING MY TUT!
This tutorial is my own creation. Any similarity to any other tut is coincidental and completely unintentional.
Please do not copy it, upload it to another website you may share the link to the blog or the tutorial page directly.
☼XtenzivImage☼
©2009-All artwork used remains the copyright of the creators


No comments:
Post a Comment