
I am using a ©Caron Vison image you need a
licence to use this art which can be purchased from CILM
Scrapkit Easter By
MoonEyedMarie
** A dear friend please leave her some love when you download her kit!
I even capitolized the MEM part of tag Title for MoonEyedMarie.HUgzz***
Font: Freebooter Script
(Just having the .TTF file open and minimized on your task bar will allow PsP to detect your font without you having to install it.)
Mask is Gabeez Mask3 Place this file in your masks folder.
This Tutorial was created using Corel's Paint Shop Pro® with the understanding that you have a working knowledge of this program.
(I used PhotoX2 but you should have no trouble recreating it with earlier versions of PSP)
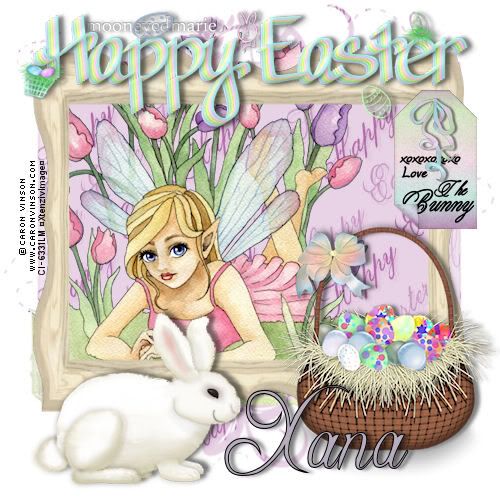
Open a new image 500 X 500 transparent and flood fill white.
Click on lavender HE layer of MoonEyedMaries easter kit copy and paste to new image as a new layer.
Apply GabeeMask 3, source luminance> show all mask> fit to layer.
right click the mask in layer pallet, merge group.
***Now the next 2 steps depend on the image you use with your tag (for eg. if your image will fit under the frame without sticking out the top then you can skip this step.)**
Open and copy the image layer1 of CaronVison tube (fairy and the flowers) paste as new layer and resize by 80%
Move your image around a bit so the solid part of the mask shows the whole fairy re-apply GabeeMask 3, source luminance> show all mask> fit to layer.
(all this does is takes off the rough edges and blends it all together)
Click on wood frame layer of MoonEyedMaries easter kit copy and paste as new layer,
you'll notice it doesn't fit so
using your pick or deform tool(it looks like an arrow) and move the sides in untill it fits the edges of your mask.
Click on tag layer of MoonEyedMaries easter kit copy and paste as new layer resize by 40%
** Here i added xoxox Love the bunny to the tag but you can write whatever you like.
i suggest using a small script
type font color black.***
Click on ribbon layer of MoonEyedMaries easter kit copy and paste as new layer resize by 50% twice then again by 80%
Add a drop shadow V= -1 H=1 Opac= 57 blur=2 color black
Click on basket layer of MoonEyedMaries easter kit copy and paste as new layer resize by 60%
Add a drop shadow V= -2 H=2 Opac= 57 blur=4 color black
Click on open eye rabbit layer of MoonEyedMaries easter kit copy and paste as new layer resize by 60%
Add a drop shadow V= -2 H=2 Opac= 57 blur=4 color black
Click on open wordart layer of MoonEyedMaries easter kit copy and paste as new layer resize by 80%
Add a drop shadow V= -2 H=2 Opac= 57 blur=4 color black
Add your name i used freebooter script BGcolor b7acbe and stroke black 000000.
Add your license info and taggers mark if any.
Merge All Flatten and your done.
GREAT JOB!
THANK YOU
SO MUCH FOR TRYING MY TUT!
This tutorial is my own creation. Any similarity to any other tut is coincidental and completely unintentional.
Please do not copy or upload it to any other website. You may share the link to the blog or the tutorial site
☼XtenzivImage☼ ©2009 -All artwork used remains the copyright of the creators
☼XtenzivImage☼

No comments:
Post a Comment