
I am using a ©Kenny Kiernan image you need a
licence to use his art which can be purchased from Artistic Minds Inc
Scrapkit Emo Cutie By Kristins Wicked Scrapz
Font: Segoe-Print
(Just having the .TTF file open and minimized on your task bar will allow PsP to detect your font
without you having to install it.)
Mask is Gabeez Mask42 Place this file in your masks folder.
This Tutorial was created using Corel's Paint Shop Pro® with the understanding
that you have a working knowledge of this program.
(I used PhotoX2 but you should have no trouble recreating it with earlier versions of PSP)
Open a new image 500 X 500 transparent and flood fill with a color that compliments the page it's being posted on,
i Chose Black because my desktop background is black.
Open EC Paper4 and paste to new image as a new layer.
Apply GabeeMask 42, source luminance> show all mask> fit to layer.
right click the mask in layer pallet, merge group.
Duplicate this layer and Image flip move around so you see the film lines line up (see my tag for referance).
Merge the mask layers together.
Open EC Frame 2 resize by 80% copy and paste to image as a new layer.
Add a drop shadow V -2 H 3 Opac 86 Blur 8 Color black.
Now grab your pick or deform tool and select your mask layer drag the sides out so they expand outside frame 2
Open EC Wordart 1 resize by 70% copy and paste to image as a new layer.
Open EC Flower 3 resize by 50% then by 70% copy and paste to image as a new layer.
Add a drop shadow V -2 H 3 Opac 86 Blur 8 Color black then Duplicate flower.
Open EC Flower 4 resize by 50% then by 70% copy and paste to image as a new layer.
Add a drop shadow V -2 H 3 Opac 86 Blur 8 Color black then Duplicate flower.
Arrange the flowers any way you like around the bottom
Open EC Doodle 2 resize by 50% image flip copy and paste to image as a new layer.
I put mine at the top off to the side it looked good up there with a white background so you can
judge your tag and decide which elements suit it best.
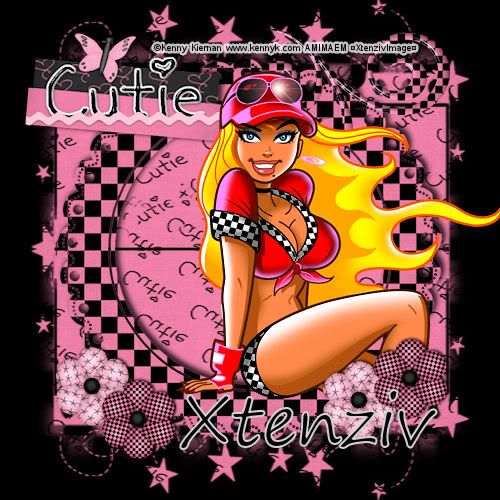
Add your main tube I used one of Kennys Nascar Babes.
Add a drop shadow V -2 H 3 Opac 86 Blur 8 Color black
On tube layer using the lasso or freehand selection tool >Point to point> No feather> Anti-alias checked
With kknascarbabe2 image I selected the portion of the tube from the flowers down and deleted selection.
Add your name i used Segoe Print, size 68,stroke 2
Change forground color to #d1d1d1 and background to #000000 Black
Add all your copyrights, **note if you used a black bkg make sure your © info is in a color you can see**
(or use Eyecandy 4000 Gradiant glow : glow width 3.00, soft corners 25 opac 100 and check draw only outside)
Add your license info and taggers mark if any.
Merge All Flatten and your done.
GREAT JOB!
THANK YOU
SO MUCH FOR TRYING MY TUT!

This tutorial is my own creation. Any similarity to any other tut is coincidental and completely unintentional.
Please do not copy it, upload it to another website you may share the link to the blog or the tutorial page directly.
☼XtenzivImage☼ ©2009 -All artwork used remains the copyright of the creators
No comments:
Post a Comment